
What is a Swim Lesson Plan?


Think of a lesson plan for swimming as the roadmap for your instructors to follow. Lesson plans are the guideposts along the path to a successful swim lesson. They help with the class’s flow and skill transitions. With a well written lesson plan you’ll naturally flow from one swimming skill into the next. You’ll gracefully move from underwater activities to glides to arm strokes.
Some Swim Lesson Plans will include song lyrics or specific word scripts for the instructors to sing or say.
Well written prepared swim lesson plans will include obvious flow or organization. They will be easy to read and include site specific scripts, lyrics, and teaching terms. The best lesson plans will be water proof. Sometimes they are laminated or printed on waterproof plastic. Depending on the template, plan or guide that you’re using, you may have a lesson plan in a table format, or a list. The more comprehensive swim lesson plans will include directions on which skills to do in what order, what to say, how to organize a class, and provide adaptive techniques for varied ability.
How should Swim Lesson Plans be used?
Generally there are two kinds of lesson plans, In water plans and out of the water. We’ll go over both versions and give you the benefits and negatives of each one. Depending on how you want to implement your swimming lesson time you can do a combination of both or either.
In water plans:
Swim lesson plans that you can use in the water are either laminated or printed on some sort of waterproof paper or plastic. They will ideally float on the surface, or be colorful enough to easily be found if they sink to the bottom. There are a variety of different types of in water plans. There are small index size sheets connected by a ring, laminated 8 1/2 x 11 sheets of paper, plastic slates with print directly on them, waterproof flexible paper, booklets of waterproof material, and many other forms.
Benefits of In Water Swim Lesson Plans:
The primary benefit of having a lesson plan in the water with you as you teach is being able to immediately pick it up and reference it. When the swim lesson plan in is your hand you can quickly glance at the sheet to tell you what you’re doing next, or to give you the line for your next swimming skill script. Should you forget the lines to the song you’re supposed to sing next, read them off the lesson plan! The huge benefit of an in water swim lesson plan is that it is water proof and you can use it in the pool with you.
In Water Swim Lesson Plans are waterproof! You can use them in the pool!!
Lesson plans you can use in the water are an excellent way to have a large amount of information within your reach. Having a guidepost with cues and scripts on it allow you to focus more on the stroke correction instead of wondering what you are going to do next. If you don’t have a strong swimming teaching background, having a swim lesson plan in the water with you allows you to follow what is written.
In water lesson plans allow newer swim instructors to jump in and teach. Provided they know the terms and basics of what is written on the swim lesson plan, they can start teaching quicker. Using an established routine can better start your instructors on a good path. Newer swim instructors lack the experience to let them on the fly assess what each swimmer specifically needs to work on and personally tailor a lesson to each swimmer. Lacking that learned and trial and error experience swim lesson plans give instructors a way to achieve the same results using a prewritten guide.
Negatives of In water Swim Lesson Plans
If your staff or you are unfamiliar with the lesson plan you have, you will be spending more time reading the lesson plans and understanding what they’re asking instead of teaching. Once you’re in the water ideally you’ll have a grasp of what each activity is. Sometimes instructors get distracted by what is written on the form. They might get sucked into reading and ignore their students in the water.
Using a lesson plan requires some additional training. Instructors will need to read through the lesson plans. You should demonstrate or review each item on the lesson plan so the instructor clearly knows what is being asked. If you’re using your own lesson plans the language should be familiar and consistent with the program you follow.
[Tweet “We call streamlines: blastoffs, rocket ships, zoom zooms, superman, cone head, grow to a tree”]
Using a lesson plan in the water sometimes gives the impression of incompetence. It is possible that the students or the parents of your lessons may think that the swim instructors don’t know what they’re doing because they keep checking their lesson plan. Sometimes when instructors don’t know what to do or are confused by the lesson plan lyrics or scripts, they become hesitant when talking to their students. Sometimes they get confused looks on their faces and it can erode the confidence of their swimmers and the parents.
One more negative to using a lesson plan in the water is that it might get lost, misplaced or require precious lesson time to find it. Every minute of a 30 minute lesson should be used, and if your instructors are spending 5 minutes walking to the wall to read their lesson plan, the parents and students may get frustrated. We want to avoid time wasting as much as possible, and occasionally having a lesson plan in the water can lead to distraction and a gap or break in the flow of the lesson.
Out of the water Swim Lesson Plans
Instead of giving your instructors laminated or plastic fabricated swimming plans you can print out your plans and templates on sheets of paper to be filled out before or after a lesson. Have the instructors write out their lesson plans and because they are actively involved in its creation they’ll have a better chance of learning and taking control of their classes. You can use lesson plan creation as a way to train or test your instructor’s knowledge about a certain skill or ability level in your program. Have an instructor fill out a lesson plan template using only FREESTYLE skills and games. Perhaps after a swim lesson have your instructors fill out what they did during their class as if they were teaching someone else how to teach swim lessons. Use a blank template that is a framework for how you want that information presented and allow the instructors to fill in the details.
[Tweet ” Using whiteboards, signs, or chalkboards are excellent under utilized tools to guide your swim instructors.”]
Write out your basic swim lesson plan on whiteboards for each class. We use a small whiteboard with dry erase markers to detail what skills and activities each specific class should do. Sometimes we give the instructors leeway in what they do specifically or how to go about accomplishing a goal. We’ll write down: “game – 5 minutes Focus on underwater” or “Front Glides with Face in water and kicking.” It is up to the instructor to accomplish the task, but allows them the freedom of how to go about accomplishing it.
Benefits of Out of water Swim lesson Plans
- Easy to see. High visibility for your instructors and for swimmers, should they look at the plans. If you write out your lesson plans on large whiteboards or on chalkboards or signs, then your instructors will be able to easily see and read them without moving to a piece of paper. The larger typeface and letters will make it easier to see and easier to quickly know what they are supposed to do.
- Lesson plans can be placed behind the swimmers so the instructor can see them and read them with little noticeable distraction. Sometimes when looking at a smaller page type of lesson plan a swim instructor will look down and read it giving the impression of stalling or confusion. By having the whiteboard or chalk board behind the swimmers, the swim instructor that is facing the swimmers will be able to glance at the plan and read it without appearing to.
- Use it anywhere! If the out of water swim lesson plan is one that is used before or after a swim lesson more as a training tool, then it will give the instructor a better understanding of the program and the skills in it. Hopefully by writing out a lesson plan or studying one, the swim instructor has learned something. We hope that through practice, reading, rewriting and engagement the swim instructor will retain how and why we do specific swimming skills.
- You can use out of the water swim lesson plans anywhere. You are not limited to in the pool and during a swim lesson. You can use them during training sessions in a conference room, a pool office, or at home. You can also use the in water swim lesson plans this way too! Just because they’re designed to be used in the water during a lesson doesn’t mean you shouldn’t use them out of the water too as a training device!
[Tweet ““Use your Swim Lesson Plans in the water, or as a training tool during your In-services!””]
Negatives of Out of the water Swim Lesson Plans
- Difficult to read or see. For chalkboards, whiteboards, signs: if you don’t write them clearly or large enough your instructors will not be able to see them. If you only have 1 chalkboard and it is fixed to the wall at a single location, then you are severely limiting who can use it and who can read it. Only classes located to the fixed location will benefit from the swim lesson plan you’ve written down.
“Some Out of the water Swim Lesson Plans may not be mobile”
- Can’t use them during a lesson. Pre-swim lesson and post-swim lesson plans usually aren’t used in the water. Because the plans are not with the instructors during the lesson, they may forget a crucial skill or script. They might even forget a logical connection between floats, glides and swimming. While swim lesson participants are typically children and quite adaptable, our goal is to always present a consistent lesson experience. When the instructor forgets a script of a way of teaching we have 2 divergent ways of teaching the same thing that might not be in line with the program we’re teaching.
- Instructors forget important info. If you use paper as the medium for your Out of Water swim lesson plans and they’re used on the deck, they may get wet and destroyed. Instructors will often reference material after their lesson and forget to dry their hands and damage the paper. Sometimes the pool deck is especially splashy or wet with puddles and the paper may succumb to the wet environment.
The best swim lesson plans are a combination of both In water and Out of the water
Use swim lesson plans in multiple ways to get the best out of them. Swim lesson plans are an excellent tool and you can use them constantly throughout your swim program. Prepare a template for your instructors to fill out before their lessons. Encourage them to follow their plan (provided that you agree with it and approve its sequence and language) and supplement their plan with your own directions or key focus points on a whiteboard or chalkboard near their lesson area.
Give them a cheat sheet to reference in the water that has scripts for specific swim skills like back floats or front glides.
List on the cheat sheet lyrics to songs in case they forget them. Use in water plans to provide specific details that might not fit on a bullet point style whiteboard. Follow up the lesson with the instructors writing down what they actually did and list notes for any follow up during the next lesson. Possibly include child or swimmer specific successes or deficient points.
[GARD]
How to create your own Swim Lesson Plans
You may have researched the internet for useful and high quality swim lesson plans. It is incredibly difficult to find anything with any useful information on it. Many are blank or include vague and useless activities. American Red Cross Swim lesson plans are locked behind a pay wall or non-existent.Red Cross swim lesson plans are typically laden with superfluous skills not worth testing or explicitly focusing on. Starfish Aquatics give no lesson plans other than some general block lesson plans. Those are only accessible after a hefty license fee which explicitly prohibits you from digitizing or adapting to your program. There are a smattering of other lesson plans and programs offered around the internet. Swimminglessonsideas.com created our own premium swim lesson plans that you can use, adapt or modify. The digital medium allows you to print them off anywhere and infinitely anywhere you have an internet connection.
“What if you want to create your own Swim Lesson Plan, or can’t afford a high quality one?”
Use these tools to make your own
Find an existing swim lesson template. As mentioned previously many programs provide a wireframe or blank framework for you or your instructors to fill out with specifics. We offer a few versions here that you can download.
- https://www.swimminglessonsideas.com/wp-content/uploads/2013/06/Daily-Lesson-Plan-Template.xls
- https://www.swimminglessonsideas.com/wp-content/uploads/2013/06/Daily-Lesson-Plan-Template.pdf
- https://www.swimminglessonsideas.com/wp-content/uploads/2012/06/Swim-Lesson-Plan-Level-11.pdf
- https://www.swimminglessonsideas.com/wp-content/uploads/2012/06/Swim-Lesson-Plan1.pdf
You may be able to search the internet for other sites that offer templates that you can fill out on your own. You’ll need to have some intimate knowledge about what skills you want to do, what games and songs you should play and in which order.
Use Microsoft Excel or other spreadsheet based program like Google Documents or sheets.
Libre office and Open Office have good spreadsheet functions and customization too. Start with a box about the size of a sheet of paper and then decide what you want to include and what you want the focus on.
- Excel
- Publisher
- Adobe Illustrator
- Lucidpress
Each of these tools exist to create personalized content for personal and business. Remember to go into your document creation with a plan and a specific goal for what you want to accomplish.
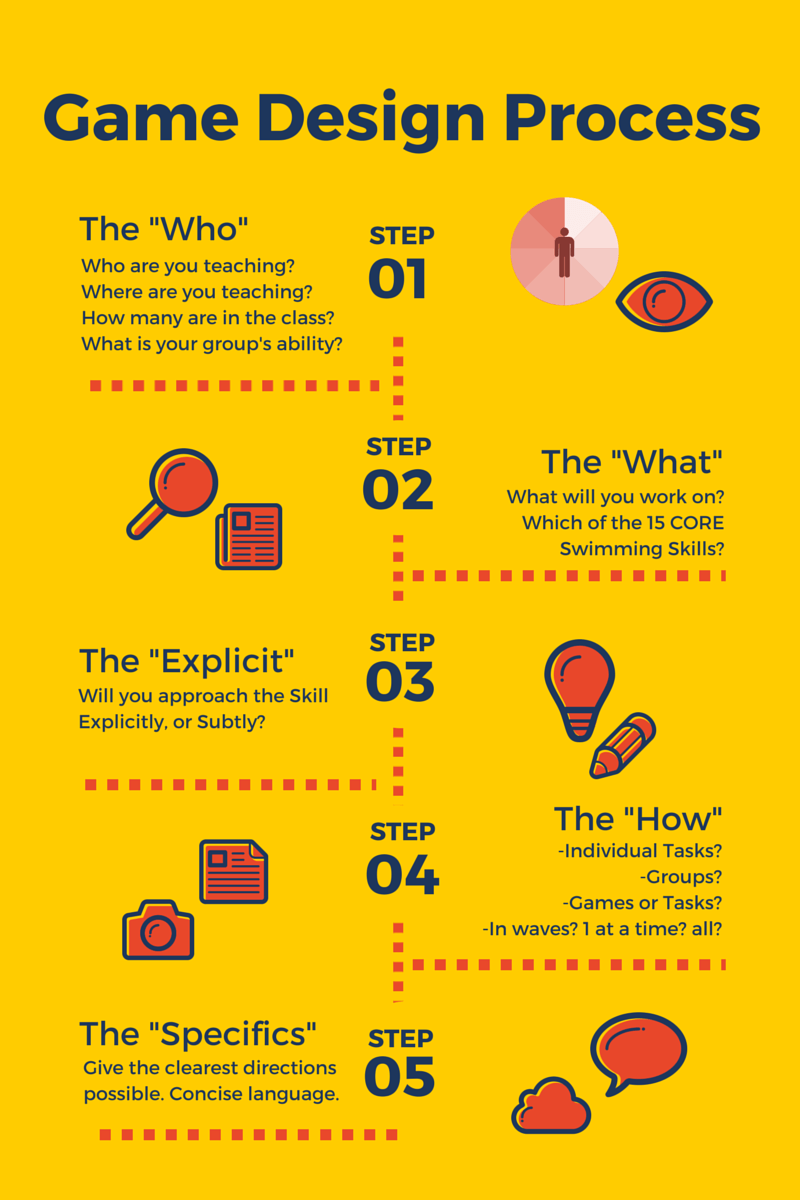
Design your own Swim Lesson Plan, Goals “How” and “What” are your focus
Before you jump into the infinite possibility of lucidpress or excel, you should have clearly written down or in your mind What skills you want to accomplish and Why you do them. Finally you should think about How you want to accomplish everything.
How
- Where in the pool will this particular class happen
- is it in the shallow end, zero depth, deep end, access to diving well, access to deck space
- will the participants be able to stand without going underwater
- Do participants have access to a wall
- is the water deep enough to fully submerge participants
- What resources will the instructor have access to?
- Kick boards
- barbells
- diving rings
- toys: buckets, scoops, floating ducks
- noodles
- lifejackets
- How much space will each class have in the water
- Can the instructor be mobile and move around?
- Is there a wall area that the class can use to get in and out of the water
- For each skill or activity how exactly should the instructor teach or conduct that activity?
- what script should the instructor use for specific skills
- How should the instructor hold a participant when assisting?
- What are the lyrics to the songs the instructor is expected to sing or play
- What are the rules to games?
Consider each of the above listed items when planning how you are going to accomplish each task or activity during a swim lesson. First you should think about where the lesson will happen. Second, what level or group of participants are being taught? Move from there to what you want to accomplish, and then reference back to how you are going to do each thing before committing to it.
What
- What level are you teaching?
- Level, group, age, subsection of program
- What are the main skills taught to that group?
- Underwater, Glides, armstrokes, movement, breathing, kicks
- What are the main testable skills this group is working towards?
- There are a lot of diverse and a wide range of skills techniques and activities to do in the water. Why are people enrolled in your program and what are they trying to accomplish?
- Going underwater
- Floating with face in the water and learning horizontal body position
- Moving through the water
- What do you want to do to get your participants to their goal?
- Front glides with support 10 times willgetthemtotheirgoalofdoinganunsupportedfront glide.
- gradually remove support through competence and proficiency.
- Front glides with support 10 times willgetthemtotheirgoalofdoinganunsupportedfront glide.
- What can you do to offeraninterestingandcompellingflowofactivitiestoaccomplish your goals?
- How much time do you want to spend on any one activity?
- Start with logical activities and build up to more complicated ones
- Begin with bobs, transition from putting chin in the water to the lips in the water, then nose, then eyes, finally whole head.
- Do front glides with support before doing 1/2 assisted and 1/2 unsupported front glides.
- Order your swim lesson plan with increasing difficulty
- Group like skills together.
- Freestyle and Backstroke kicks go well together.
- Front and Back floats are essentially the same body motion and skill with different perspectives.
- What and How are you going to actually DO the activity you want to?
- How many times should the participants do a specific activity?
- How should the instructor support or help the participants?
- Will they go at the same time or individually?
- Where will they be doing that activity?
- What is the time limit?
You’ve planned out what you want to do and how you are going to do it. Think about logical flow and realistic flow of your activities. Consider that you should begin with easier activities and get progressively more complex as you go through each lesson. Feel free to reference previous activities done that day to remind participants of what they’ve already learned that allows them to accomplish new tasks and challenges. Allow time for movement to different locations, and for rule explanation and activity directions. Now you need to figure out how you are going to convey that information to your swim instructors in a way that is easy to read and quickly understandable.
[GARD]
Typical Design Choices
Swimming lessons can cover such a wide and specific range of skills and activities it can be difficult to present that information clearly and well. Most current lesson plans display their information in these ways:
- Tables
- Excel
- Infographics
- pictures and descriptions that flow linearly
- Lists
- List this one! Bullet points or numbers with short descriptions
- Comprehensive Combination
- Lists
- Details
- Lyrics / Scripts
- Flows
- Pictures
Tables
You can use Excel or Open Office, or Libre Office, or Google Documents to create your tables, or any other spreadsheet program. These are excellent tools because they are highly customization and typically very easy to read. Here is a table example:
| Games to play for a skill in each level | Level 1 | Level 2 |
| Underwater | Bake A Cake | Dive for rings |
In the uppermost left corner we have the table title, “Games to play for a skill in each level.” Across the top row we have the levels, “Level 1,” and “Level 2.” Going down along the left side we have the skill to work on, “Underwater.” Where the row and the column meet, we have the game that you should play. For Level 1, play the game, “Bake a Cake” to go underwater. This makes it very easy to present a lot of information in a small area. We can see a huge range of skills or activities with a list like nature but displayed with other connected information. This requires that you know what “Bake a Cake” means. If you’re not sure, then this table may not be very helpful. We could add a lot of information into the table, and make it a little more detailed like this:
| Activity Name | Activity Description |
| Entering the Water | Child and parent sit side by side with feet in the water,butt on the edge.Parent puts their arm on top of child’s hands between the child’s legs.The parent should always enter the water first.Parent swings into the pool keeping hand on their child’s hands.Once in the water, grasp child’s body or their hands.We do this because we want to prevent the child from falling over. Infants are generally wobbly and we support them with our forearm and by holding their hands between their legs. |
This is a small excerpt from our Parent Tot lesson program spreadsheet. You can see the activity name at the top, and the description to the side. It includes instructions and a highly detailed amount of text. This would likely not benefit and in the water lesson plan, or an on deck lesson plan. It would make more sense to use this as a training document for your staff to reference.
These are two extreme examples of tables and their potential use in your swim lesson plans, should you choose to create them yourself.
Infographics
Using an infographic is one of the best ways to take a lot of detailed and specific information and make it easily readable. You’ve likely seen them around the internet used on blog posts, facebook shares, and on twitter. They are popular because they’re so engaging and easy to read (when done well). Here are a few examples:


Infographics are excellent and interesting! They do not give us a clear teaching tool that is easy to create or use in our daily driving though. They work very well when you are illustrating a main point, or supplementing a training document. It might require a decent amount of planning and money to have someone create an infographic for your lesson plan. Some possible resources are:
Lists
The best swim lesson plans are typically short, brief and dense. The easiest way to convey specific ordered plans is through the list. Here is a short list of what you should do during a level 1 class. You can write this on a small whiteboard or a chalkboard for your instructor to follow.
- Get in water
- Bobs up to: [chin, lips, nose, eyes] based on comfort
- 3xeachpersondoafront glide with support
- Get chin, lips, nose, or eyes in water while doing based on comfort of participant
- 2 jumps from the side with support
- Ask each participant, “Do you want to go underwater on this jump?”
- ADHERE to swimmer’s choice!
- Ask each participant, “Do you want to go underwater on this jump?”
- 30 front arm circles where swimmers can stand waist deep.
- arms straight
- 3x each person, front glide with support and doing arm circles
- INS may need to physically move the swimmers arms in a circle motion.
- Face may be in or out of the water.
- INS may need to physically move the swimmers arms in a circle motion.
- Buckethead, The best game in the world, Game
You can write this out with this much detail, or you can do even shorter and easier:
- Get in
- 5 bobs
- 3x Front Glide w/ Support
- 2 Jumps
- 30 Front Arm Circles
- 3x Front glide w/ support w/ arm circles
- Buckethead
Provided that your instructors know what you are referring to with these instructions you’ll be able to convey a large amount of information quickly and with very little space needed or writing on the manager. These lists assume that your instructors know where the class is to be conducted, how to perform each skill or activity to the program’s specifications, proper support techniques, proper jump assistance, and what Buckethead is.
[GARD]
Comprehensive Combination
When we put all of these choices together we get the comprehensive swim lesson plan. Our goal should be to integrate each of the elements of a good plan into an easy to read and understand document. We should primarily use titles and key words that the instructors already know to queue up their next activity, but also provide detailed assistance should they forget specific scripts or lyrics. Swimminglesssonsideas.com has already created comprehensive lesson plans for Parent Tot, Level One, and Level Two. Here is an example that has an overall list, with activities numbered by order, and a table-like format where each block is color coded and labeled. It isn’t quite an infographic, but uses graphic design to be interesting to look at and compelling to have the eyes flow through each activity.
 Our swim lesson plans for sale on this site are designed to be used by beginners and advanced swim instructors. We have detailed scripts and lyrics printed on the pages to accommodate all levels of instructors. We use the numbered and color coded skills to make it easier to follow and be easily visible when used in the water.
Your goal when creating your own lesson plan should be similar.
- Easy to read
- Colorful enough to find in the water
- Consistent in design: Instructors should be able to easily flow from one activity to another
- Utilize both sides of the page if possible.
If you want to add an infographic, do so, but make it relevant and ideally providing a maximum amount of information that you wouldn’t otherwise be able to easily explain with a few words.
[Tweet “You can make your own Swim Lesson Plan, or Buy a high quality one now!”]
Get started teaching now!
You should have added to your arsenal of teaching tools some of these lesson plans, or grabbed the free ones from our posts, or by joining our mailing list:
We also offer basic and professional packages of swim lesson plans. Check out what we offer at our lesson plan page:
SwimmingLessonsIdeas.com Premium Swim Lesson Plans
If there is anything that you do to create your own lesson plans we would love to know what you think! Make a comment below and give us some idea of things you do to make it easier for your lesson instructors to effectively teach their classes. How do you train your new staff? What things do you do so instructors can easily remember scripts or lyrics?
Better swimming.
Download FREE tools.
Download a free preview of our Premium Lesson Plans & unique SwimSheets.
Stay on our newsletter to enjoy more benefits like further free downloads, guides, and tools to make your swimming program better, easier, and more FUN!


